Block paving is the go-to solution for many people, due to its versatility and low maintenance costs. It’s not as simple as it sounds to lay a perfect paved driveway or paFtio.
You need to make sure that your paving foundation is level, firm and drains well. You’ll also need to ensure that your blocks are correctly seated.
Excavation
If you’re laying block paving on slopes, it’s important to excavate in a measured way so that water can drain away. This can be done using a shovel or spade, but it might also be worth hiring a mini-excavator for the job.
Once you’ve surveyed the area to be excavated, it’s time to begin the process of digging. The slope of your land will determine the depth required. We recommend a drop of 1cm for every 60cm you plan to lay paving.
Next, you’ll need to put in a sub base for the block paving to rest on. To make foundations up to 100mm thick, you’ll need a mixture of one-part cement with six-part ballast. Before laying the blocks, level the sub base using string lines, screeding tracks and a straight edge.
Before you lay the blocks, ensure that you have checked the design of the blocks to make sure they fit together correctly. You will need to fill in any gaps between the blocks with a paving saw, block splitter, or other tools.
When you’ve finished laying the first layer of blocks, you’ll need to rake out any remaining sharp sand from the top. It is best to lay blocks starting at the bottom on a slope, preferably at a right angle or straight edge.
After you’ve raked out the sharp sand, cover the entire excavation with a 6-inch layer of 3/4- to 2-inch washed crushed stone that has sharp edges that knit together (river gravel is unacceptable). This can be compacted once or twice using a plate compactor across and lengthwise.
It’s a good idea for beginners to block paving to get help from a paving specialists adelaide. These professionals are skilled in laying block paving correctly, so you can get a driveway that looks great and lasts for many years.
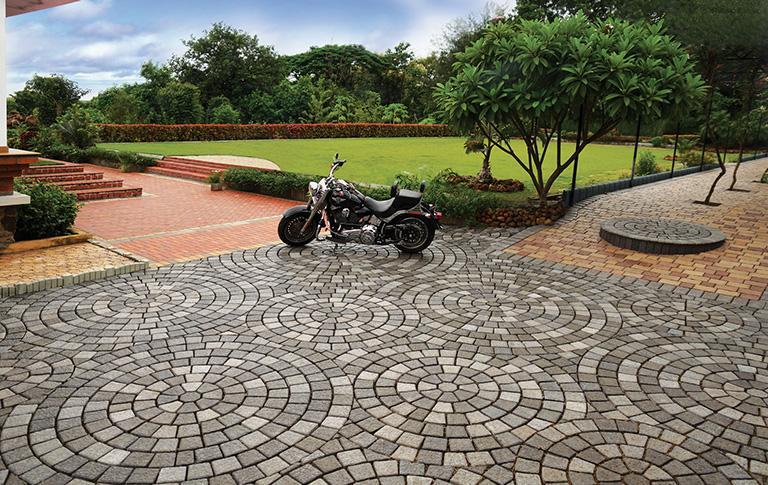
Concrete block paving is the most popular type of block paving. There are many types of block pavers that can be used to cover your garden or home. This type of paving is durable and can withstand heavy traffic and a variety of harsh weather conditions. This paving is also very easy to maintain, making it an excellent choice for patios and driveways.
Sub-Base
A sub-base is necessary to lay block paving. It will give the course an even, firm, and strong surface. The sub-base should be a minimum of 100mm thick and compacted down using a compacting plate. The sub-base should be profiled or graded to match the planned finished paving profile.
A good quality, hardcore aggregate, such as MOT Type 1 should be used as the sub-base material. This is usually a mixture of granite limestone or basalt crushed to no more than 40mm in size. To help it bind together, you should mix it with water.
During excavation, string-lines and staves should be inserted to mark the level where your paving will go. This will allow you to excavate your paving area to a depth that is 12 or 16mm deeper than the house. This will ensure that the paving isn’t going to fall out of line and cause damage.
Once the sub-base has been laid, it should then be levelled and raked evenly across the entire area. The edges should then be restrained, using a ratchet strap. Check out for landscapers adelaide.
The edge course should be sanded to the required level using damp sharp sand (6mm limestone to dust aggregate). To finish the job, use a compactor to level up your paving to the required m2 (this will add around 10-15% for breaks).
With your paving blocks in place, start by sweeping in kiln-dried sand at the corners and in the gaps. This will make the paving smooth and seamless, which will last many years.
After a few weeks, the bedding material and any filler materials will settle into the spaces. It is crucial to lay your sub-base accurately. Otherwise, the paving won’t look as good and lasts as long.
Then, lay the paving blocks in random patterns and use different packs to achieve even colour distribution. You can also spread kiln dried jointing sand on the blocks and sweep it into any joints. Finally, use a compactor to compress them down.
Edge Restraints
Edge restraints are essential for block paving installation. They prevent paving stones from shifting around and allow the joint fill to be installed properly. You can choose to use plastic or concrete restraints.
Concrete is a popular choice to protect paver edges. It’s both cost-effective and flexible. Concrete can also withstand extreme weather conditions like freeze-thaw cycles. However, it can also chip and crack.
Steel edge restraints are a good alternative to concrete for most applications. They’re durable and can be hidden when used with the proper base material.
They are also much easier to install than plastic edges restraints. The main difference is that steel is able to withstand lateral pressure.
Steel is more resistant to the elements than plastic. It’s also more durable than wood and can withstand a lot of weight.
Because it is more flexible, it can be more attractive than plastic. It also has a rounded edge that will match the shape of your paving stone.
The downside of using steel is that it’s more expensive than plastic and can be difficult to install. It’s also more difficult to hide than plastic and it can rust.
If you use steel, it can be hard to clean up after a job. It can also be difficult to use if the surface you’re working on is slippery.
Lastly, it can be hard to install properly when you’re working with concrete. It can be time-consuming and costly to drive the stake into the ground.
Manufactured edge restraints like Snap Edge are designed by engineers to withstand lateral loads and maintain interlock. They are made from materials that can withstand this pressure and installed with appropriately spaced spikes that are driven into the compacted base.
The best way to determine which type of edge restraint you need is to carefully consider the style and application of your project. It’s up you to choose the one that suits your budget and needs.
Blocks
Block paving is a great method to create a beautiful and durable driveway, patio, or path. It involves a number of steps, including prep, digging, edging and finally laying your paving stones.
Before you begin laying, make sure to plan out your paving project and get all the materials and equipment you need. This includes your sub-base, damp sharp sand and kiln-dried sand.
Once you have sourced your materials, it is time to decide how you want to finish the area. You can either draw a design on paper, or use a specialist paving plan service.
Next, you need to excavate the area to a depth of at least 15cm below the surface of whatever is next to your paved area. This will allow rainwater to drain from the paved area.
Level the sand to correct falls with string lines, screeding rails and a straight edge. A 5cm layer damp, sharp sand should be added to the top of your sub-base.
Screeding the sand is very important, as it allows you to level it off and produce an even surface to lay your paving stones on. This can be done by using a pair of screed rails or timber works (even if you have the tools at home).
Once the sand has been spread, level it with the screeding rails so that it is flush with ground below. This should be done at a fall of at least 1:80, so that the final laying course is a flat finish.
Lay your block paving starting at the bottom of your slope. It is best to start from a right angle, or straight edge. Then, continue up the slope, making sure you are aligning your design with the slope. You can leave a gap between the block and the edging kerb on either side.
If the gap is larger than this, you can use each side’s edging kerb to level it. You can then use a length of board that is longer than the width of your path and cut a notch in it so it sits over the edging kerb on each edge.
Share this content: